
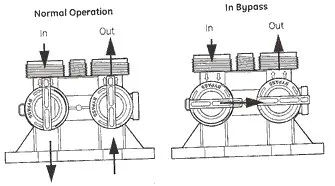
System Bypass
Slider
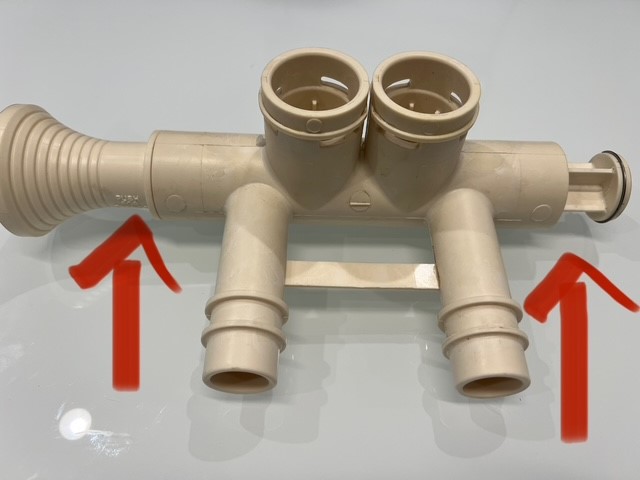
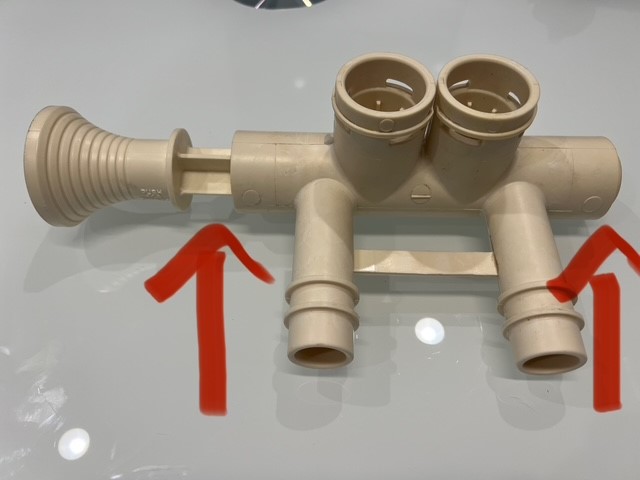

For treated water, white side of slider should be pressed in and black side should be out. To bypass, push in the black side of slider. For white bypass, to bypass system push small end in until large plunger pops out.
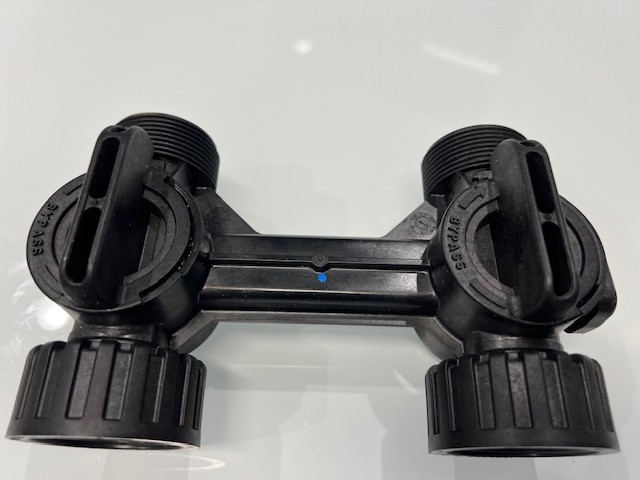
Quad-Flow
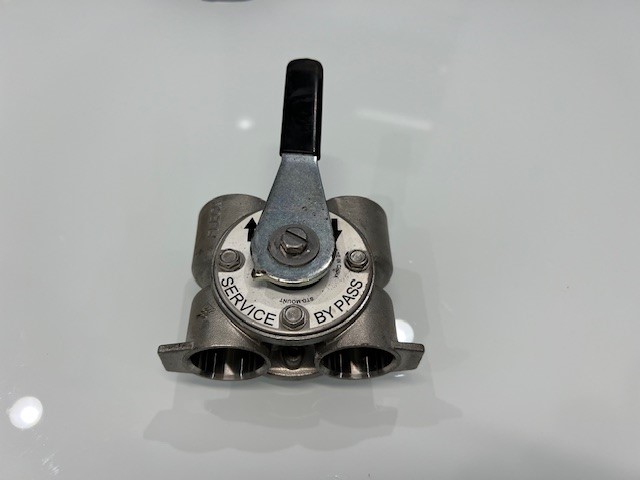

For treated water, blue/black handle should run parallel with the pipes.
To bypass, Swing blue/black handle so it points to bypass.
3 Ball Valves
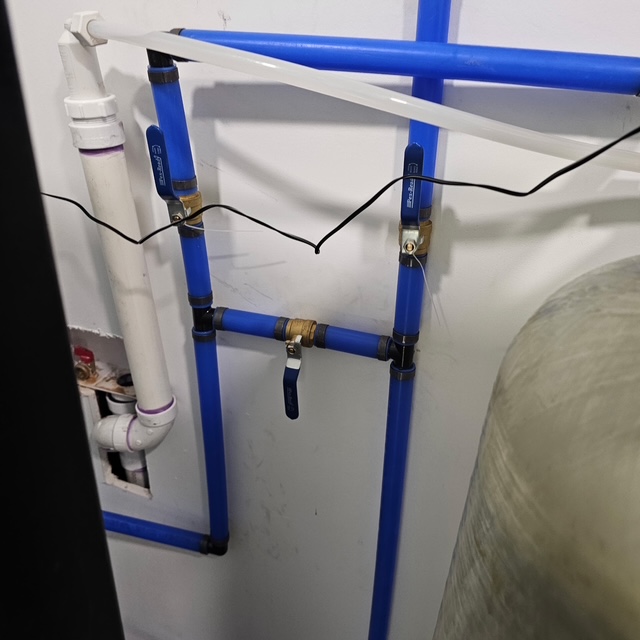

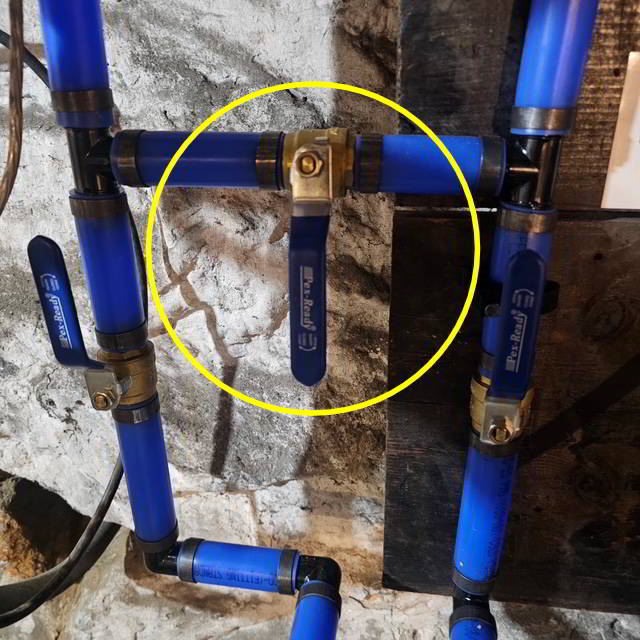
For treated water, the center valve must be closed and the in and out valves should be open. The valve is closed when the handle makes a “T” with the pipe.
To bypass, open the middle valve and close the in and out valves.
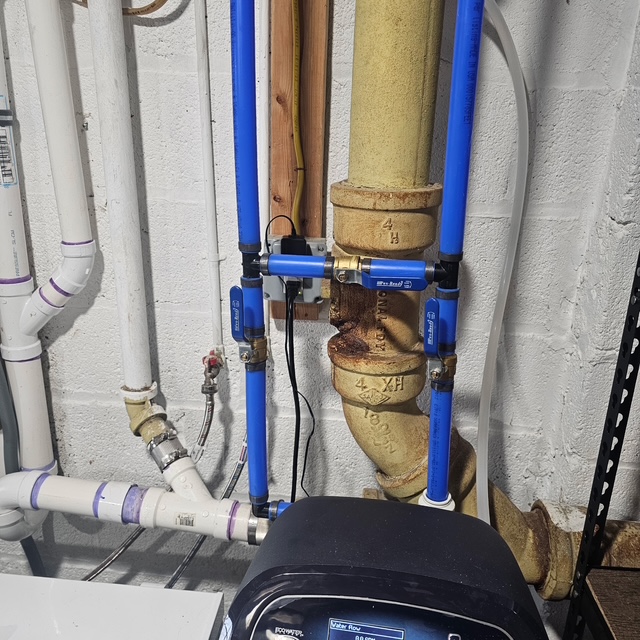
Stop Valves

For treated water, center valve must be closed and in and out valves must be open. To bypass, open center valve and close the in and out valves.
Related Products

For treated water, red valve must be closed and two blue valves must be open. To bypass your system, open the red valve and close the two blue valves.
Twist Valves

For treated water, both valves should be vertical. To bypass, turn both valves to a horizontal position
Timer Reset
WT Series Timer
Pull out on the timer gear and turn it so the timer arrow is pointing to the current time of day. Then, simply push timer gear back in. When the timer is set to the current time of day, your water conditioner will regenerate between the hours of 2 and 4 AM.
EEC1502 Timer
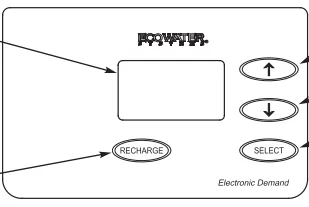
If the words “PRESENT TIME” do not show in the display, press the SELECT button several times until they do.
1. Press the á UP or â DOWN buttons to set the
present time. Up moves the display ahead; down sets the time back. Be sure AM or PM is correct. Press Select.
NOTE: Press buttons and quickly release to slowly advance the display. Hold the buttons down for fast advance.
Fleck Timer (2500, 2510, 2850, 2900)
Press and hold the red button to disengage the drive gear. Turn the large gear until the current time of day is at the time of day timer. Release the red button to again engage the drive gear. When the timer is set to the current time of day, your water conditioner will regenerate between the hours of 2 and 4 AM.
Fleck Timer (5600)

Press and hold the red button to disengage the drive gear. Turn the large gear until the current time appears above arrow. Release the red button to again engage the drive gear.
ECR 3000
Use the UP or DOWN keypads to set the present time of day, being sure AM or PM shows, as applicable. Press the UP keypad to move the display ahead; press the DOWN keypad to move the time backward. NOTE: Each press of a keypad changes the time by 1 minute. Holding a keypad in changes the time by 32 minutes each second. Pressing the SELECT/EXIT keypad will set the clock.
ECR 3500
- From any of the rolling status screens, press the SELECT (O) button to display the Main menu
- Press the DOWN button to scroll through the menu options until Basic settings is highlighted
- Press the SELECT button to display the Basic settings menu
- Make sure the Current time is highlighted
- Press the SELECT button to display the Current time screen
- Press the UP or DOWN buttons to change the time. Hold the button down to rapidly advance. Be sure the AM or PM is correct (unless softener is set for a 24-hour clock)
- Press the SELECT button. The display will go back to the Basic settings menu
- Press the LEFT button twice to return to the rolling status screens
ESS 1000, ECO 1000, ECO 2000
- Press the CURRENT TIME AND DAY keypad. The hour display continues to flash.
- Press the SET keypad until the present hour of the day shows. Be sure AM or PM shows.
- Press the CURRENT TIME AND DAY keypad to steady the hour display. Minutes begin to flash.
- Press the SET keypad until the present minutes show.
- Press the CURRENT TIME AND DAY keypad again to steady the time. A day of the week begins to flash.
- Press the SET keypad until the present day of the week shows.
- Press the CURRENT TIME AND DAY keypad again to steady the entire display.
ESS 1000x
Press the SELECT keypad to set the present time. Press the UP or DOWN keypads to set the present time of day. Be sure AM or PM, as applicable, also shows.
ECO 3000
Use the (+) and (-) arrows to set the present time of day, being sure AM or PM shows, as applicable. Press the (+) arrow button to move the time ahead; press the (-) arrow button to move the time backward. NOTE: each press of the button changes the time by 1 minute. Holding a button in changes the time 32 minutes each second.
Logix
Setting the Clock
The system controller has an 8 to 24-hour built-in back up system to maintain the time of day. If the power is out longer than 8 hours, the time is lost and needs to be reset.
When dashes are flashing, press the square enter button. Advance through screen when it is flashing and you can set it.
Logix auto shows time
LD has gallons showing on display
- Press the SET button. The display will flash 12:00
- Use the UP or DOWN buttons to advance to the correct time. Note: there is a PM indicator, but no AM indicator
- Press the SET button to accept the time of day selected
- The control will advance to the DAY OF WEEK setting
Setting the DAY OF WEEK
The controller can be set for the specific day of the week. It is important to set this for proper system operation. A cursor will be displayed under “SU” (Sunday).
- Press the SET button to make the cursor flash
- Use the UP or DOWN buttons to advance the flashing cursor under the correct day of the week
- Press the SET button again to accept the changes
Maintenance
Acid Neutralizers Neutralite Refill
- Bypass your system or turn off main water supply.
- With a screwdriver push in and turn red button on timer control counter clockwise to backwash to relieve pressure on valve.
- Disconnect pipes and drain tube from back of control valve.
- Spin control valve off, counter clockwise.
- Siphon water out of tank to level of neutralite.
- Be sure to cover distributor hole in center of tank with a crumpled paper towel or distributor cap so no neutralite falls down the hole.
- Refill neutralite up to 8 inches from the lip of the tank. Caution: Do not over fill tank.
- Apply a small amount of silicone to tank threads and black O-ring on bottom of control valve then Spin control valve back on tank, clockwise, just until snug.
- Reconnect pipes and drain tube to back of control valve.
- SLOWLY turn water back on, keeping valve in backwash position to flush out air and fines (from neutralite) out of tank.
Proline Reverse Osmosis Filter Replacement
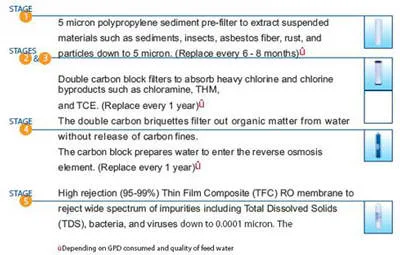
- Turn off water supply to reverse osmosis unit.
- Turn off valve on storage tank.
- Open reverse osmosis faucet at sink to relieve pressure.
- Using the filter wrench (supplied) turn the filter housing clockwise.
- Remove old filter and replace with a new filter.
- Apply a small amount of silicone on O-ring.
- Replace filter housing turn counter clockwise.
- Turn on valve on storage tank and turn water supply back on.
Soda Ash Refill & Maintenance
Mixing Directions
In a 5 gallon container, mix 1 heaping cup of soda ash per gallon of hot water. After mixing thoroughly, pour solution into the holding tank. repeat this until the holding tank is full. You should bleed the pump after each refill to insure there is no air in the lines.
It is very important to use hot water so the soda ash will dissolve and not solidify on the bottom of the holding tank.
Bleeding the pump
If the pump is not pumping solution there may be air trapped in the lines. If this happens the pump will have to be air bled. Refer to page 6 in your manual while following the directions below.
- While pump is running, turn adjustment screw (bleed valve) counter clockwise.
- Run with valve open until a solid stream of fluid comes out of the bypass tubing.
- Close air bleed valve by turning adjustment screw (bleed valve) clockwise.
Water testing
The pH of the water should be tested to ensure the pump is working properly
Pump stroke adjustment
If the pump needs to be adjusted use the dial on the backside of the pump. Turn the dial up 10% if the pH is too low. Turn the dial down 10% if the pH is too high. The pump must be running while making these adjustments.
Greensand Maintenance
Once a month, add 2.5 lbs of potassium permanganate to the feeder tank. To add the potassium, remove the lid on your feeder tank and pour 1/2 of the 5 lb container. A 5 lb container of potassium should last approximately 2 months.
In order for the system to function properly, it is critical to maintain enough potassium in the feeder tank. To check if there is enough potassium in the feeder tank, insert a small wooden stick into the mixture. The stick should be stained a deep purple. If the stick is light pink or has no color, you must add more potassium.
The potassium pad should be rinsed out with water every 6 to 12 months. This will remove the build up of iron on the felt pad. Use rubber gloves and old cloths when doing this maintenance. The potassium will stain your hands, cloths, sinks, and any other item it comes in contact with.
The injector inside the control valve should be cleaned every 3-6 months. See cleaning your injector, or preventive maintenance section of your owners manual.
If you experience purple water from your faucets, do not drink the water. Run the tap for 15-20 minutes until the color clears. When the water runs clear, you can use the water. Call Portasoft and schedule a service call to correct the problem.
Cleaning Your Injector
- Unplug the power cord from the wall.
- Shut off water supply or bypass system.
- Push in red button and turn to backwash to relieve system pressure.
- Using a screwdriver, remove injector screen and injector cap.
- Clean screen using a fine brush. Flush until clean.
- Using a needle nose pliers, pull injector straight out.
- Flush water into injector screen recess of the valve body to flush debris out through the injector recess.
- Clean and flush the injector.
- Lubricate the O-rings on the injector, injector cap and injector screen with silicone lubricant
- Reinstall the injector, injector cap and injector screen. Caution: Do not over tighten the plastic cap. Seat the cap lightly into position. Over tightening may cause breakage of the plastic cap that may not be immediately evident.
- Plug in the power
- Slowly open the water supply or return bypass valves.
What to Look Out For
My system is constantly leaking, what should I do?
If your system is constantly leaking, here’s what you can do:
- Bypass the System: Temporarily bypass it to stop water flow while you troubleshoot.
- Identify the Leak Source: Check valves, seals, and connections for signs of water leakage. Inspect the drain line and fittings for damage or loose connections.
- Inspect Components: Look for worn or damaged seals, O-rings, or fittings. Check for clogs in the drain line.
- Manual Regeneration Test: Run a manual cycle to see if the leak worsens during regeneration.
- Get Professional Help: If you can’t find the issue, visit our support page or contact us for expert assistance.
How much salt do I need in my salt tank?
There is no proper level for your salt in your salt tank. You may fill the entire tank or add one bag at a time, which ever is convenient for you.
How do I know if I need to add potassium to my green sand system?
Once a month add 2.5 lbs of potassium permanganate to the feeder tank. To add the potassium, remove the lid on your feeder tank and pour 1/2 of the 5lb container. A 5lb container of potassium should last approximately 2 months. In order for the system to function properly it is critical to maintain enough potassium in the feeder tank. To check if there is enough potassium in the feeder tank, insert a small wooden stick into the mixture. The stick should be stained a deep purple. If the stick is light pink or has no color, you must add more potassium.
How do I know if my neutralizer needs to be refilled?
The general time frame for a neutralite refill is about 9 months. The best indicator of when to fill your neutralizer is to shine a flashlight behind the fiberglass tank. This will illuminate the tank and make the neutralite level easy to determine. Your neutralizer is full when it is about 8 inches down from the lip of the tank. When the neutralite is down about 16 inches from the lip of the tank, you will need a neutralite refill.
I have a green sand system and in the morning my water looks pink.
What should I do? Run the cold water until the color is gone, you may want to check your manual on how to clean your injector or call our office to set up a service appointment.
My system is running constantly.
What should I do? If your system has been running for more than three continuous hours, if possible, call our office and have someone walk you through stopping the cycle or bypass the system and unplug the electric cord until a service appointment can be made.
My system is constantly leaking.
What should I do? The best option is to bypass your system. There are several ways to do this depending upon which type of bypass you have. Bypass your system and call our office to set up a service appointment.
My system is leaking when it regenerates.
What should I do? Wait until your system has completed its regeneration, then simply unplug the electric cord. This will stop the machine from regenerating, then call our office and set up a service appointment.